
The editing software of choice for my debut novel-length work was Literature and Latte’s Scrivener. Its organizational features let you scale beyond your former, short-form projects’ tools (e.g. Microsoft Word). You’ll hate organizing book-size content in a ‘flat’ tool like Word. But to max-out your mileage in Scrivener, you’ll want a few tweaks to its out-of-the-box templates.
Scrivener provides ample flexibility — some at the cost of a learning curve — but my tweaks below let you leverage pretty useful features with hardly any effort.
Scrivener Like a Pro
Let’s start looking at tweaks to help you organize.
Structure the Binder
Without doubt, the Scrivener feature I use most is the Binder, which is a hierarchical representation of your story-structure. This makes navigating to scenes way easier than if they were all piled into one gigantic .docx file or — horrors! — split into multiple .docx files on the filesystem.
In the Binder, re-order scenes, just by dragging, totally saving you from accidentally selecting too much or too little when things need to be moved.

My tweaks: I wanted to use a temporal beat-structure (e.g. Hero’s Journey or Save the Cat). I re-purpose ‘folders’ for this. But, of course, you don’t want something called “Crossing the Threshold (beats6-12)” showing-up in the actual book. Judiciously use the Include in Compile attribute (and/or Section Type: N/A in the Custom Metadata pane of Inspector), et voilà.
For book chapter divisions, I created a normal scene-doc and changed its Section Type to Chapter Headings then just starting dragging other scene docs into it. In this way, I could defer ‘chapterization’ ’til later, e.g. after finding cliff-hanger scene endings worthy of being a chapter ending.

Outline Via Corkboard
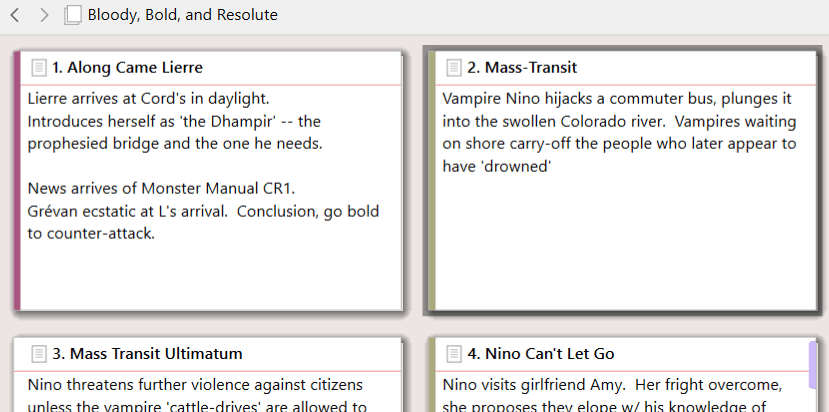
The Corkboard view is really where re-ordering gets sophisticated. The beauty of the Corkboard is that you see each scene’s Synopsis, now you know which cards need to be dragged before or after others, just at a glance. No need to open-up the scene doc, wade through supporting text, reacquaint yourself with all that the scene’s about. Select a chapter (or Save the Cat folder), and Corkboard shows you the scene-cards (or chapters, respectively) contained therein. Tip: Always turn on View | Corkboard Options | Card Numbers.
The Editor view’s side-panel, called the Inspector, is a good place to customize the scene Synopsis. Or just do it inline in the newly created card. Tip: Need a bridge scene? Add a card with the Synopsis “TK — Joe must learn the Macguffin’s stolen property”.
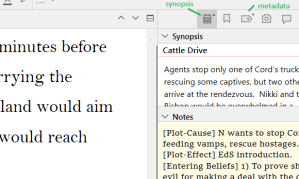
There’s a Notes pane in the Inspector, too, in which I put the cause-n’-effect information that stitch the scenes together, as well as the ‘Entering Beliefs’ and ‘Exiting Beliefs’ related to its POV char’s (typically the protagonist’s B-Story ‘misbelief’). Sadly, I don’t know of a visual way to create a visual dependency-graph for plot-cause and -effect, but at least I’ve noted it here, giving me some hints where I might need to percolate fixes to other scenes, etc.
Corkboard view allows you to Arrange by Label, which gives swim lanes to each label-value, the card’s location in the swim lane after the most recent scene no matter what other label swim-lane that occurs in. My tweaks: In Project | Project Settings | Label Values, I change this to Custom Title: PoV and now the swim lanes show me scenes focusing on that character. (The title change also percolates to UI, e.g. View | Use Label Color In becomes Use PoV Color In, … which is how I got binder-items PoV-colored screen-shot up top.)
A Comments pane exists in the Inspector, too, and is handy for when inspiration strikes while you’re already in the flow of some other idea. Select some text then Insert | Comment (Shift + F2). Comments should be handy for collaboration, like if your .scriv folder lives in cloud-storage, but I’ve no experience here.
Metadata Fields and Labels
With View | Corkboard Options, I can have the notecards label-colors on the left-edge, color-chips for the keywords on the right-edge, and a status watermark over the card (in the Corkboard screen-shot above, “Along Came Lierre” has Lierre’s deep-red right-edge, “Mass Transit” Nino’s dark-amber)
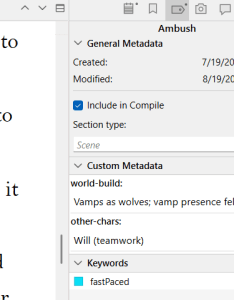
I created custom metadata fields via Project | Project Settings … to describe the following:
- Which world-building facts appear. I use this to 1) find the first-occurrence of some concept (i.e. where to belabor describing it), and 2) check subsequent occurrences for consistency and/or spreading-out the info-dumps. Trope names could go here (e.g. ‘Deal with the Devil’, etc.).
- Which NPCs appear in the scene (and any important changes to their arc/conflict/state)
- Keywords related to pacing, backstory, etc.
My tweaks: By adding custom Keywords like “slowPaced” and “fastPaced”, I can see by the Corkboard card color-chips if I’m depleting the reader’s adrenal glands (or melatonin stores) with too much back-to-back of a given pace.
My tweaks: I also add a custom Status value, “Candidate”, that helped me explore totally random plot ideas as alternative scenes, allowing me to play with each and keep the best. The Corkboard watermarked such cards with diagonal status text.
Change the Inspector pane to see or edit metadata. Note: with a Project Search (Ctrl +Shift + F), you can find even metadata fields, e.g. search for just “fastPaced” scenes for a pass at ridding long sentences from them.
Outline View
Scrivener’s Outline view helped me in later stages of work. A Total Words field is very handy to get a sense where there’s likely fat to be cut, pacing to be improved, load-balancing to do, etc. (Little anecdote here: I was terrified how I’d write enough to fill 80-100k words … until I hit the 50% plot-complete mark and extrapolated from Total Words. 🫨 Now I was in full-on weed-wacker mode!)
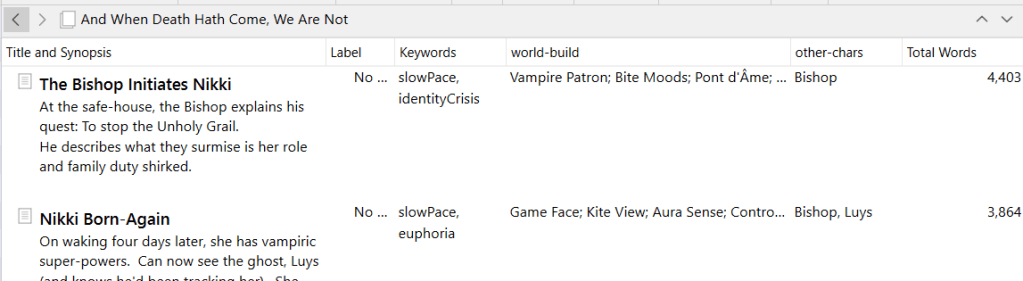
My Tweaks: Through View | Outliner Options, I have it show my custom metadata.
Honestly, it demands a lot of discipline — that admittedly I only inconsistently have — to add trope-names/keywords/etc. everywhere they occur. One can also ctrl+click in Binder to multi-select documents, then Project | Project Keywords | ... | Apply Keyword to Selected Documents to retroactively tag many scenes at once.
Notice how including the metadata columns in the Outline View makes it start to approximate either a Plot Grid (planning [1]) or a Reverse Outline (revising [2] [3]) table? Reverse Outlines is a good validation step exposing gaps, unnecessary repetitions, neglected arcs, etc. (plus, a literary agent might ask for scene-by-scene summaries anyway, so …) Keeping such story-as-written notes in-situ in the editor (vs. Excel) was a desired property.
But … something interrupted me.
Reverse-Outlining Via NotebookLM
Have you heard of Google’s NotebookLM? If you tell Scrivener to compile your manuscript to .pdf, say, and upload it as a ‘source’, you can ask interrogate the scene-structure, e.g.
I would like to create a Narrative Outline (a.k.a. “reverse-outline”), generating a table of a) Scene Summary, b) Nikki’s emotional state, c) Nikki’s B-Story/flaw evolution, d) the relationship/conflict/support (RCS) between Nikki and Will, e) RCS Nikki and Luys, f) RCS Nikki and Lierre.
You’ve already seen the love/fear I have for AI, but the resulting analysis was really pretty quick and rather useful. Plus, I can re-project on different dimensions in mere seconds, and so I do (whereas with the manual tagging would involve re-reading and pain). I’ll make another blog-post about how useful I find RO, but here you can see how I used Scrivener to tee-up the task.
How to Style Better
Scrivener decouples the editor styling (i.e. font, text-size, etc.) from the compiled-output’s styling. There isn’t even a ‘Body Style’, per se, which is quite disorienting for someone used to MS Word. Tweaking everything to be right at compile-time was more frustrating than I expected. My Tweaks: Pick a compile-target and clone it, then edit the compile styling there.

You can then choose from several out-of-the-box format choices for the various document Section Type options in use in your project. I advise going through each Section Type to see if you’ll be happy. File | Compile … | Assign Section Layouts.
Below, I’ve picked one that will emit the chapter number, centered on its own line, followed by the ‘document’ title (e.g. “In the Beginning, Darkness Moved” which you see in the Binder view at the top of this post. It’s doc of Section Type: Chapter Heading. That doc itself has no body text, rather the doc name will become the ‘Section Title’. (Normal docs, e.g. the “Intro” scene is of Section Type: Scene and expands inline as normal content.)

You play with things like the separator-line between scenes via the File | Compile … little gear-icon | Edit Format …, e.g. the Separators | Text Files | Separator between sections entry. Honestly, I hate the UI here, with the Edit Format dialog and the Assign Layouts dialogs seemingly doing battle with each other for dominance. While working here, now’s not the time to forget to take your blood-pressure meds.
Be Happier with Miscellany
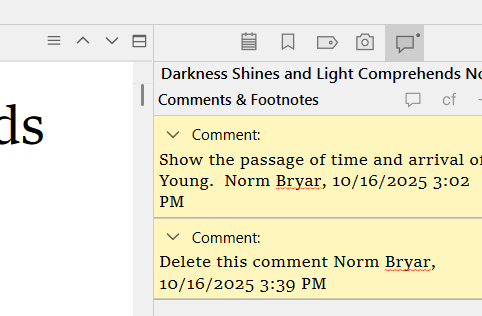
Engage ‘Scrivenings’ mode (ctrl+1) when you select a parent document (chapter or Save the Cat folder), this mode lets you read/edit the scenes in one contiguous experience. Use the hamburger-menu icon (three lines) top-right of the editor to navigate among that scrivening (or click a doc in the Binder to break out of it). As far as I know, the best way to see extant Comments in your project is to open a scrivening mode and look at the Footnotes & Comments panel in Inspector.
By using View | Text Editing | Typewriter Scrolling, the current line being edited stays center-screen.
Rebind some of the hotkey commands, for instance, Windows PowerToys squats on Win+Shift+R, the default Reveal in Binder hotkey, so I remap Scrivener to use Ctrl+Shift+R (and just sacrifice the command formerly using it by clicking the little circled-x icon). Do this via File | Options | Keyboard (in which you can then search).
Some other toolsets can work with Scrivener projects, e.g. ProWritingAid ‘Everywhere’ component will work within the Scrivener editor.
Whew! Long post. Je suis désolé. Thanks for reading.
If you found this helpful, have writing-process/-tools questions, or have your own Scrivener experiences or tips to share, please do leave a comment below.

Leave a comment